| <<< Microscope Andonstar AD246 | Double H bridge from PCBWay v1.0 >>> |
Quadcopter JJRC H106
The gadget in moving pictures with sound
You can buy the JJRC H106 in the EU online shop of Geekbuying (Czech Republic)
or directly from the Chinese warehouse
You will get a discount with the coupon code: NNNEUJJRCH106
By purchasing via the specified affiliate links, you support HOITG without any additional costs for you - thanks!
How Open Is This Gadget?
| Category | Remark | Info |
|---|---|---|
| Firmware |
Firmware is closed source. |
? |
| Software |
Drone needs no additional software. |
? |
| Hardware |
The components are very easy to replace, common screw types, nothing is glued. |
? |
| Electronics |
Electronics well protected insides the chassis. |
? |
| Website |
No firmware uptates or spare parts available on the website. |
? |
| Patents |
As far as I know, JJRC doesn't claim patents on the H106. |
? |
About the gadget
Figure 1: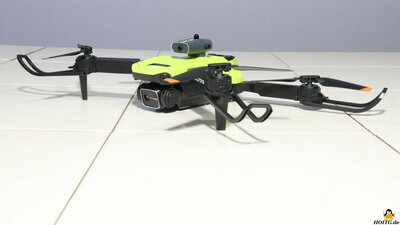
The JJRC H106 is a low-priced remote-controlled quadcopter that lets you get started with this fascinating class of aircraft without having to break the bank.
The quadcopter's chassis and arms are made of high-impact plastic, and the rotor blades can fold back in case of cantact with an obstacle. Overall, the drone is very rigid and can withstand common crashes without damage - I tried that successfully several times involuntarily.
Due to the weight of well under 250g, the quadcopter can be flown without an EU drone license. However, the operation is not hazard-free, as the sharp-edged rotor blades are not completely shielded, the gadget is not foolproof, the pilot should have common sense. The low weight of the aircraft of just 125g also contributes to the resistance to damage.
Technical Specs
| Category | Value | Remark |
|---|---|---|
| Weight | 125g | Drone, including battery |
| Dimensions | 30x24x6.5cm | Inflated arms |
| Cameras |
Tiltable front camera Fixed camera on underside |
Physical resolution unknown. Pictures are transmitted with 2048x1080 pixel. Front camera transmits better quality. |
| Batteries | 3.7V, 1800mAh | Charging circuit integrated in battery box |
| Flight time | About 10 minutes | Charging time 2 hours |
Package contents
Figure 2: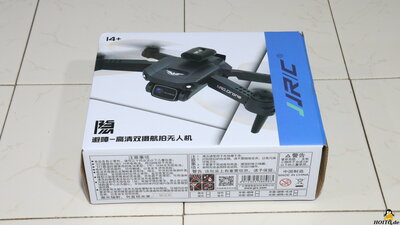
In addition to the aircraft, the package contains the necessary remote control, a second battery, spare propellers and a bag useful to store and carry it all around.
Assembly
Figure 3: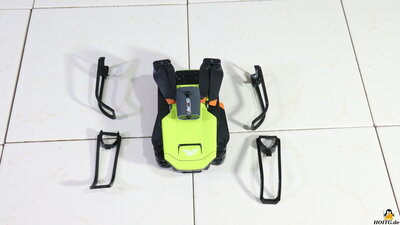
The JJRC is delivered fully assembled, for transport only the brackets for the rotor protection are removed and the arms with the rotors are folded in.
Cameras
Figure 4: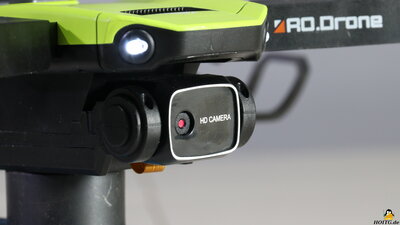
The main camera is located at the front of the chassis and can be tilted from pointing horizontally gradually going to the downwards view. However, the motor used for this is not implemented for image stabilization of the camera during flight.
A second camera is located on the underside and faces vertically downwards.
Both, the still images as well as the video stream of both cameras transmitted to the smartphone app are saved the with a resolution of 2048x1080 pixels. However, this in no way corresponds to the physical resolution of the cameras, the image data is scaled up by software. As written before, this is a budget drone, so realistically you can only expect an image quality at the lower end of the scale. The image quality of the camera mounted on the underside is significantly worse than that of the front, tiltable camera.
Electronics/Gimmiks
Figure 5: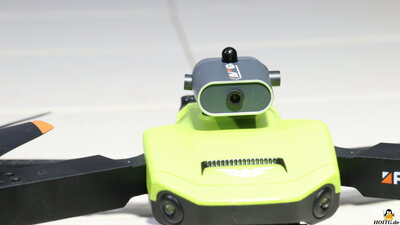
The structure at the top of the chassis contains infrared transmitting and receiving diodes, with the help of which obstacles in the path of flight are to be detected. However, one should not expect miracles from the obstacle avoidance implemented in this way.
The same applies to gimmicks like gesture recognition and more: The features are supposedly somehow available in principle, but if they are implemented at all, so only in a very rudimentary manner. According to the price tag, the H106 is a device for having fun in manually controlling a flying object, not for Hollywood-ready film productions or autopilot functions.
Flight preparations
Figure 6:
The quadcopter is switched on using the push button on top of the chassis - the front LEDs start flashing.
The remote control has a slide switch to turn it on.
To activate the radio link to the drone, the "throttle lever" must be pushed all the way forward and then be moved all the way back. If "full throttle" is then given again, the rotors begin to turn slowly to signal that the drone is ready for take-off. After that any acceleration cause the drone to rise and the fun can begin.
You can do this with safety goggles on your nose, a lot of practice, as well as scratched furniture, walls and fingers indoors, but this is not really recommended. Again, the H106 is an aircraft and learning to fly by remote control is a lot of fun. It takes some practice before your brain switches in time when the drone is rotated around its vertical axis, because the control reacts mirrored as soon as the drone camera points to the pilot. The first hover flight training should therefore take place with the camera pointing away from the pilot, of course better outside of your own four walls. A training session lasts about 10 minutes at a time, then the battery is empty and has to be recharged.
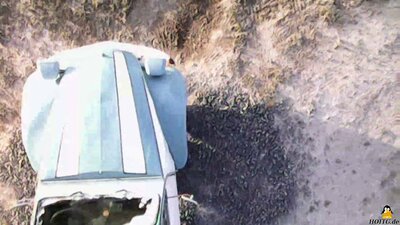
Aerial photos of both cameras:
Photo H+I are from the fixed camera on the underside.
My conclusion
Not a professional drone for filming, but an inexpensive fun device for learning to fly that can transmit a bird's eye view to a smartphone as an extra.| <<< Microscope Andonstar AD246 | Double H bridge from PCBWay v1.0 >>> |
![]()
![]()
![]()