| <<< CNC machines | 3018 Pro Max >>> |
Test procedures CNC machines
General
I deliberately do not give any ratings for the tested machines in the videos! I would like to leave that up to you, because only you know what you expect from a machine. Furthermore, slogans such as "The best machine at price X" are usually obsolete just a few days after a video has appeared, since there are many manufacturers in the area of cheap machines fighting for the best price.So watch the high-resolution photos taken of the test results to form your own opinion. When making the videos, I also try to show the milling processes in close-up views. You can eventually see the worse runout of a spindle, but you can definitely hear it, so keep your eyes and ears open when watching the videos! For all tests there is: if you can't see any real differences on the photos of the test results of two machines, then consider them equal and focus on other things, such as the openness of hard- and software! Don't start interpreting the smallest differences in the photos, that's just not relevant in practice. Keep your feet on the ground and don't listen to any self-proclaimed experts (myself included).
Wood
Wood is a product formed by nature, so one piece of wood is never exactly the same as another piece of wood. In addition to the different degrees of hardness, the fiber structure must be taken into account, which limits the maximum achievable "resolution" and also ensures that the direction in which structures are milled has a noticeable impact on the result.
|
|
| 1920x1080 | Full res |
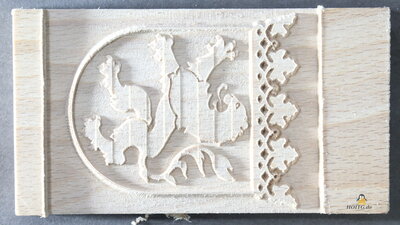
CNC machines in the low price ranges usually have a relatively large amount of backlash or bend under load. When milling, you should therefore make sure that the direction of force on the milling cutter is always the same for optimal results. This is exactly what is achieved in this test by processing the template line by line, so the best possible result that a milling machine can achieve is shown.
When looking at the pictures of the test results, make sure that the surfaces of the motif lying on different levels are milled as smooth as possible. The fine details on the claws of the lion's paws and on the top edge of the coat of arms should be clearly visible.
The used G-code file (Hesse.gc) and image template is part of the download package.
|
|
| 1920x1080 | Full res |
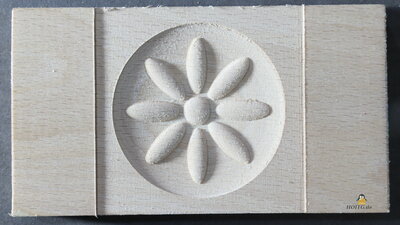
Here, all surfaces are curved. These should also be as smooth as possible. As with the previous test, the material is removed line by line in order to show the best result possible.
The used G-code file (relief.gc) is part of the download package.
Plastics
In contrast to wood, plastic is a very homogeneous material, so the milling direction is irrelevant. It should be noted that the material melts when heated, so the cutter should not cut through the material too slowly. However, CNC machines from the lower price segment usually have such a high backlash in the mechanics that too fast milling leads to vibrations building up, which limits the maximum milling speed.
|
|
| 1920x1080 | Full res |
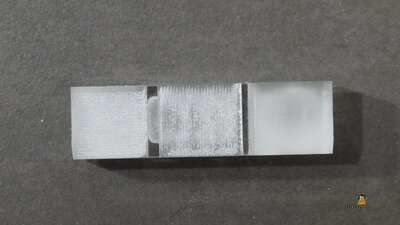
On the left, the material is removed from left to right (X-direction) and the cutter is offset by 25% of the cutter diameter (=0.625mm) in the Y-direction after each line.
In the center, the removal takes place from the back to the front (Y-direction) and the cutter is offset by 0.625mm to the right (X-direction) after each line.
On the right, the removal also takes place in the Y-direction, but the cutter is only offset by 0.1mm to the right after each line.
Ideally, flat surfaces with only faint parallel lines should be visible. The more backlash there is in the mechanics, the rougher the result.
The G-code file used (planing.gc) is part of the download package.
|
|
| 1920x1080 | Full res |
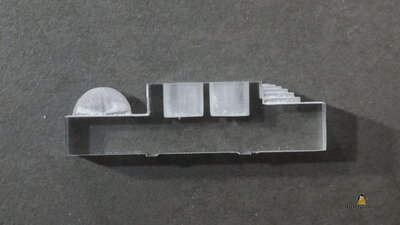
A hemisphere with a diameter of 12mm is milled on the front edge. The cutter removes the material in the Y-direction and is moved further in the X-direction by 0.1mm after each line. Backlash in the mechanics can be seen in the video when the milling cutter dips into the material (deflection to the left). On the finished workpiece, this becomes noticeable in a deviation from the spherical shape. The hemisphere is more deformed, especially on the right, the more the frame of the machine bends under load.
Semicircles are milled on the rear edge. With each step, more material is removed per pass. The step heights are 0.2, 0.4, 0.6, 0.8, 1.0 and 1.2mm. The edges of the circles should be parallel and milled nicely round.
Two U-shaped grooves, each 7mm deep, are milled in the center piece, first clockwise and then anti-clockwise. The cutter plunges 0.2mm deeper per pass. The more backlash there is in the mechanics, the clearer it is to see where the milling cutter dips into the material or where it is lifted again. The deviation from the ideal shape (rectangle inside) must also be taken into account. The side view shows whether the baseline is straight and parallel to the top edge of the workpiece.
The G-code file used (3D-sphere.gc) is part of the download package.

|
|
| 1920x1080 | Full res |
The surfaces of the milled pockets should be nice and flat, the lines should be evenly wide (deep) and smooth.
The G-code file used (HOITG-tux.gc) is part of the download package.
Isolation milling a PCB
In the insulation milling test, a 43x47mm through-hole circuit board for a flip-flop circuit is made from a copper board. The height of the board is not measured (no leveling) before milling, which means that the angularity of the mechanics also influences the result.

|
|
| 1920x1080 | Full res |
The milled grooves should be evenly wide. The more backlash there is in the mechanics, the more frayed the edges of the traces are. The drilling of the holes should be well centered.
The G-code files used are part of the download package.
| <<< CNC machines | 3018 Pro Max >>> |
![]()
![]()
![]()